Side chaining Tutorial
Level: Beginner
General Overview: Learn how to stylize your synthes by adding some side chaining to get interesting affects. (Sorry no pictures only video this time)
Time: Around 10 minutes or less.
The link to the video can be found below.
SIDE CHAINING VIDEO
----
Ok well I'll admit I didn't learn side chaining till later on in my life. Once I learned though I instantly added it to my style. Side chaining can get you a nice pumping sound from your synthe and give you a good club feel. It can be used in tons of situations and multiple genres. You can place it on a pad or even a bass to get that sound your looking for. Play around with it and you'll soon see what you can do with it.
In FL Studios it's not so apparent on how you can get that effect. Sure you could automate it but thats just a pain all around. The easiest way to do it and the way I do it is through the Fruity Peak Controller which can be found in the FX for your Mixer channel.
So how do you set it up? Well really you can use anything, I commonly find myself using a Fruity Kick because I've never really used it for anything else. Anyways add a fruity kick or whatever you would like to affect your synthe to a new channel. Give it a mixer slot and name it SIDECHAIN. Now that you have it linked to a mixer channel in the 8th slot (it really doesn't matter which slot) put a "Fruity Peak Controller". It is auto set to MUTE so if you want the synthe or sample to still make sound unmute it (bottom right corner of the controller). Mess with the controls after it is linked to something for now leave it as default.
Linking it to something is pretty simple. I like to link it to the volume knob (which is pretty common amongst Trance music and the likes). So right click the volume knob and click on "Link to Controller...." A new window should now pop up with some settings. In this window set the "Internal controller" to "Peak Ctrl (SIDECHAIN). Then for the mapping formula I like to set it to "Inverted" pick one that suits you best or make your own. (Math is needed to make your own)
Once your all linked make a pattern in the Fruity Kick channel maybe a 4 to the floor kick pattern or whatever you prefer. Make sure whatever your Synthe is linked to is playing, it should be apparent what it does when you hit the play button. It's fairly easy from here and just play around with the settings and find what you like best.
If you find anything wrong or something that needs a change leave a message and I'll try and change it.
Saturday, July 5, 2008
Thursday, June 12, 2008
3XOsc Lead Tutorial (Video Included)
Author: MrMilkcarton - Nick Tomassetti
Level: Beginner
General Overview: Learn how to make a good filter and lead Synthe with FL Studios 3XOsc.
Time:20 - 30 Minutes or so depending on how much you already know.
Video Link for those who have a good understanding of the buttons already here is a video (Pause to get settings): 3XOsc Lead FL Video Tutorial
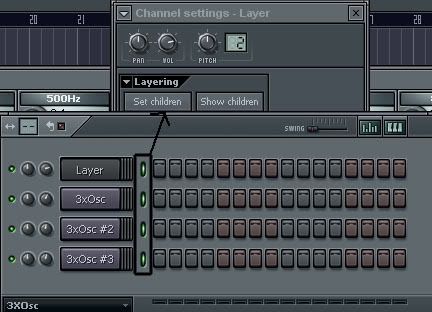
1. Ok lets start off by adding a Layer and three 3XOsc to the Step Sequencer. Now link all of the 3XOscs to the Layer by Holding shift and clicking on the Dashes to the right of the 3XOscs. Once all three are selected in the Layers channel hit “Set Children“. What this does is allow you to play all three of the 3XOscs piano rolls just using the Layer’s piano roll. Like so -
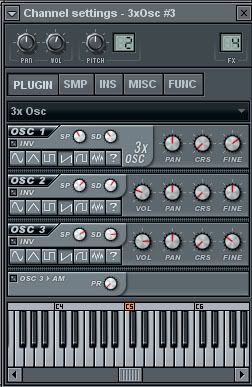
2. Ok now that we have set everything up lets make the first 3XOsc. Pick one and lets make it your main 3XOsc which will be the bulk of the sound set it to FX Channel 2. For your first oscillator hit the “?” button and you will be taken to a file viewer. Now go to FL Studios > Data > Patches > Packs > Shapes > Misc. Now chose the file named SHP_Ramp Saw.wav . Now every time you hit the “?” for an oscillator the 3XOsc will play that wave. Now set your 3XOsc to something like this -
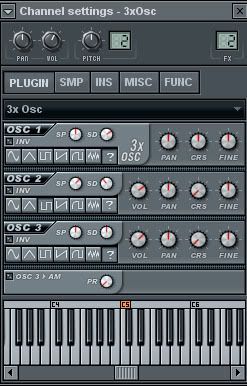
Play around with the knobs a little till you find the sound you like. I usually find my sounds by knob turning and enabling settings.
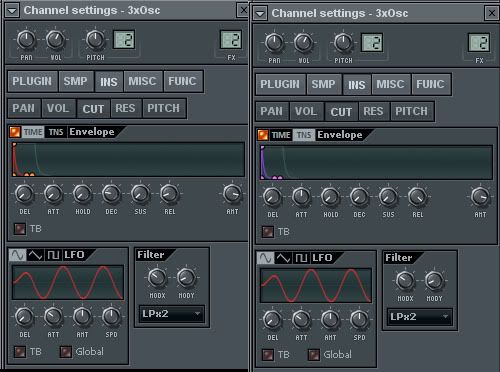
3. Now in the same 3XOsc hit the “INS” tab. This will make your 3XOsc shine in many ways if you figure it out. Make sure to have the correct sub tab selected when you set the parameters. Start with VOL then move on to CUT. Set your settings to something along the lines of this -
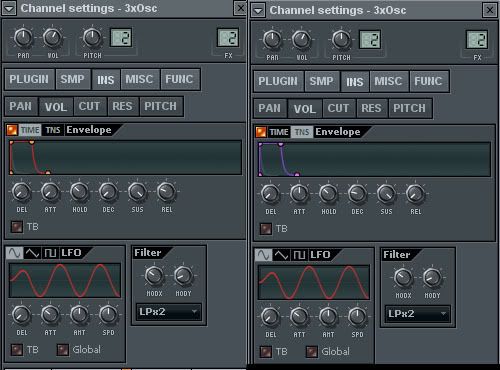
Make sure to select TNS too for the VOL and set those settings.
Now for the CUT settings.
You will be using these settings for the rest of the 3XOscs INS to get the correct Filter. For a more detailed look at the other INS settings check the video link at the top.
4. Now for 3XOsc #2 this one is our middle guy he’s somewhat hard to hear but adds to the wholesome factor that you want in a good trance lead set this one to FX Channel 3. With the 3XOsc now open hit the “?” again and this time go to FL Studios > Data > Patches > Packs > Shapes > HQ. In there you will select the file titled. HQ_Saw.wav. Now move the knobs and set your Oscillators to the below image -

Now that you have that done open up the “INS” tab and set the settings similar to step 3. I chose this synthe to have a more plucked sound so I reduced the Hold knob to zero and the sustain knob is at about the 10:00 position. The CUT is exactly the same as step 3’s.
5. Now the low end of the lead that gives it the extra push and makes it more powerful set this one to FX Channel 4. This one is much simpler and robust. There’s no importing of a file for this one it’s straight up square synthe. Here are the settings you will want to set for the third and final 3XOsc -
Tweak it till your pleased and have the sound you want. The INS channel is the same as step 3 once again.
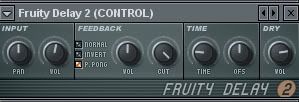
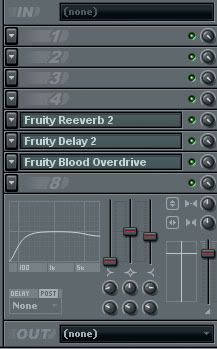
6. Now hit the layer channel play some notes. Sound really bland right? Time for the mixer channel to liven things up. So hit F9 and lets get going. Lest start with mixer channel #1. This will be your control channel which all your 3XOscs will be linked to. This is a weird thing I have developed to get a softer reverb on my synthes. Ok so rename it to “Master” or whatever floats your boat. In the 5th FX Slot added a Fruity Reverb 2. In the reverb settings, set it to the Preset called “Cathedral” this will give you a good airy feel to your synthes later on. For the 6th FX Channel add Fruity Delay 2 and turn the volume knob to something like this -
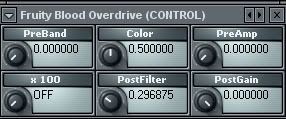
In the 7th FX slot add a Fruity Blood Overdrive and set the settings to this -
Do some quick EQ like this -
7. Time for your first 3XOsc FX Channel. Go to Channel #2 and were going to put in some FX. First off add a Fruity Phaser to FX #3 and use the Phaser Preset Stereo Enhance 2. For FX #4 add a Fruity Flanger and leave it as its default settings. In the next FX slot added a Fruity 7 Band EQ and use the Preset “Style - Club”. If you don’t have the 7 band EQ on the list when adding it hit More… and then check the box next to Fruity 7 Band EQ. Now your mixer channel #2 should look something like this with the added EQ at the bottom. Also Link your Mixer Channel #2 to #1 by hitting the little up arrow underneath Channel 1which is shown in the below image.
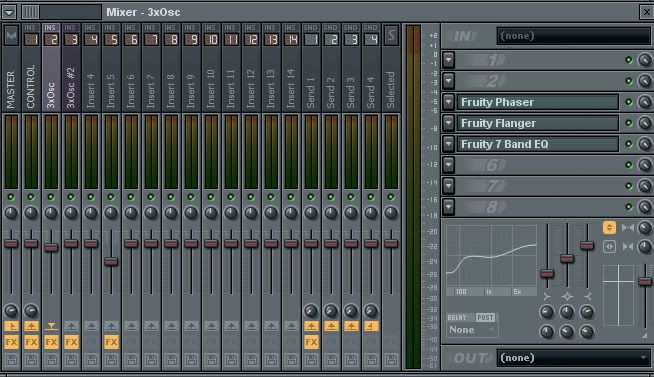
Make sure to remember to have the correct Channel selected when linking Mixer channels together.
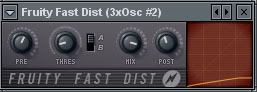
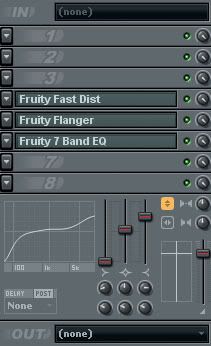
8. I’m going to keep the last two 3XOsc in one step since the third one does not require any FX. Lets start off with Mixer Channel #4. Like you did with Mixer Channel #2 link Mixer channel #4 to #1. Well Mixer channel #4 is done nothing special about it. Select Mixer Channel #3 and link it to #1 like you did with the others. In Mixer Channel 3 add a Fruity Fast Dist to FX channel 4 with these settings -
After adding the distort add a Fruity Flanger to FX Channel 5 and turn the Cross up to 0.0000. Lastly in FX #6 add a Fruity 7 Band EQ with the preset “Style - Club”. Then finish up with some EQ like so -
Make sure you linked everything and all the settings are the way you like them! Hit the layer channel and listen to your knew lead!
If I have forgotten to include anything please tell me and I’ll update the tutorial.
Level: Beginner
General Overview: Learn how to make a good filter and lead Synthe with FL Studios 3XOsc.
Time:20 - 30 Minutes or so depending on how much you already know.
Video Link for those who have a good understanding of the buttons already here is a video (Pause to get settings): 3XOsc Lead FL Video Tutorial
1. Ok lets start off by adding a Layer and three 3XOsc to the Step Sequencer. Now link all of the 3XOscs to the Layer by Holding shift and clicking on the Dashes to the right of the 3XOscs. Once all three are selected in the Layers channel hit “Set Children“. What this does is allow you to play all three of the 3XOscs piano rolls just using the Layer’s piano roll. Like so -

2. Ok now that we have set everything up lets make the first 3XOsc. Pick one and lets make it your main 3XOsc which will be the bulk of the sound set it to FX Channel 2. For your first oscillator hit the “?” button and you will be taken to a file viewer. Now go to FL Studios > Data > Patches > Packs > Shapes > Misc. Now chose the file named SHP_Ramp Saw.wav . Now every time you hit the “?” for an oscillator the 3XOsc will play that wave. Now set your 3XOsc to something like this -

Play around with the knobs a little till you find the sound you like. I usually find my sounds by knob turning and enabling settings.
3. Now in the same 3XOsc hit the “INS” tab. This will make your 3XOsc shine in many ways if you figure it out. Make sure to have the correct sub tab selected when you set the parameters. Start with VOL then move on to CUT. Set your settings to something along the lines of this -

Make sure to select TNS too for the VOL and set those settings.
Now for the CUT settings.

You will be using these settings for the rest of the 3XOscs INS to get the correct Filter. For a more detailed look at the other INS settings check the video link at the top.
4. Now for 3XOsc #2 this one is our middle guy he’s somewhat hard to hear but adds to the wholesome factor that you want in a good trance lead set this one to FX Channel 3. With the 3XOsc now open hit the “?” again and this time go to FL Studios > Data > Patches > Packs > Shapes > HQ. In there you will select the file titled. HQ_Saw.wav. Now move the knobs and set your Oscillators to the below image -

Now that you have that done open up the “INS” tab and set the settings similar to step 3. I chose this synthe to have a more plucked sound so I reduced the Hold knob to zero and the sustain knob is at about the 10:00 position. The CUT is exactly the same as step 3’s.
5. Now the low end of the lead that gives it the extra push and makes it more powerful set this one to FX Channel 4. This one is much simpler and robust. There’s no importing of a file for this one it’s straight up square synthe. Here are the settings you will want to set for the third and final 3XOsc -

Tweak it till your pleased and have the sound you want. The INS channel is the same as step 3 once again.
6. Now hit the layer channel play some notes. Sound really bland right? Time for the mixer channel to liven things up. So hit F9 and lets get going. Lest start with mixer channel #1. This will be your control channel which all your 3XOscs will be linked to. This is a weird thing I have developed to get a softer reverb on my synthes. Ok so rename it to “Master” or whatever floats your boat. In the 5th FX Slot added a Fruity Reverb 2. In the reverb settings, set it to the Preset called “Cathedral” this will give you a good airy feel to your synthes later on. For the 6th FX Channel add Fruity Delay 2 and turn the volume knob to something like this -

In the 7th FX slot add a Fruity Blood Overdrive and set the settings to this -

Do some quick EQ like this -

7. Time for your first 3XOsc FX Channel. Go to Channel #2 and were going to put in some FX. First off add a Fruity Phaser to FX #3 and use the Phaser Preset Stereo Enhance 2. For FX #4 add a Fruity Flanger and leave it as its default settings. In the next FX slot added a Fruity 7 Band EQ and use the Preset “Style - Club”. If you don’t have the 7 band EQ on the list when adding it hit More… and then check the box next to Fruity 7 Band EQ. Now your mixer channel #2 should look something like this with the added EQ at the bottom. Also Link your Mixer Channel #2 to #1 by hitting the little up arrow underneath Channel 1which is shown in the below image.

Make sure to remember to have the correct Channel selected when linking Mixer channels together.
8. I’m going to keep the last two 3XOsc in one step since the third one does not require any FX. Lets start off with Mixer Channel #4. Like you did with Mixer Channel #2 link Mixer channel #4 to #1. Well Mixer channel #4 is done nothing special about it. Select Mixer Channel #3 and link it to #1 like you did with the others. In Mixer Channel 3 add a Fruity Fast Dist to FX channel 4 with these settings -

After adding the distort add a Fruity Flanger to FX Channel 5 and turn the Cross up to 0.0000. Lastly in FX #6 add a Fruity 7 Band EQ with the preset “Style - Club”. Then finish up with some EQ like so -

Make sure you linked everything and all the settings are the way you like them! Hit the layer channel and listen to your knew lead!
If I have forgotten to include anything please tell me and I’ll update the tutorial.
Welcome to FL Studios Tips & Tricks
I'm in no way connected to the FL studio creators but I felt the urge to share some tricks and tips. The idea of this blog is to pass along tutorials, videos and everything else. The tutorials will range from beginner to intermediate and I will try to give a good judgment of the level along with what you should already know.
If you would like to add to any of the tutorials feel free to message me with your idea or a text file.
If you would like to add to any of the tutorials feel free to message me with your idea or a text file.
Subscribe to:
Posts (Atom)